Track My Roll attempts to give you the best shot tracking possible in a highly unpredictable environment.
Lighting, camera angle, camera movements and boundary settings can all affect the way the shot is tracked.
In order to get the most accurate tracking possible it is best to adhere to the following guidelines:
**IMPORTANT NOTES** The app may have difficulty tracking bowling balls with two highly contrasting colors (black and silver for instance) or a single light color like orange or light blue. Darker colored balls will generally produce the best results.
CLEAN THE CAMERA LENS!! Having a build up of oils and smudges can drastically affect the app's ability to lock onto the lane boundaries and the ball. If you video looks blurry, especially at the back end of the lane, this could be the cause.
DO NOT FOCUS ON THE BOWLER. When you tap on the screen to set your own area of focus, be sure to do so on the back end of the lane. The edges of the lane must be in sharpe focus to maintain a good track as the camera moves.
Be sure that your video recording rate is set to 30 FPS (frames per second). This is required for shot tracking and is usually the default setting for normal video recording.
1 - During recording, hold your device in a vertical orientation while keeping it REASONABLY STILL. The app is capable of compensating for small movements of the camera.
2 - All four corners of the lane should stay in frame at all times. Even if one of the corners is blocked when trying to determine the lane boundary you can use manual mode to set it.
3 - After the bowler begins their approach it is OK if they obstruct one of the corners of the lane. The app will remember where the corner was and will adjust for any camera movement.
4 - After release, the ball must not be obstructed by the bowler. Any time the ball is obstructed it will affect the tracking of the shot path and may even cause tracking to stop completely.
5 - The ideal camera position will be just off the approach behind the gutter of the adjacent lane (that is the lane to the right for a right hander or the lane to the left for a left hander). The camera position should be no more than one half lane left or right of the target lane as recording from wide angles can result in a loss of accuracy. Recording from a higher position will generally give better results than from a lower position.
6 - Fill the frame with as much of the lane as possible. It is OK to zoom in on the lane prior to the shot being rolled.


7 - End your video capture as soon as the ball exits the back of the lane.
8 - Before analysing the shot, edit your video so that there is not excessive 'dead time' before the shot is released. Seven or eight seconds seems to be a reasonable length for a shot video. You want to leave a few seconds prior to release to establish the lane boundaries either automatically or with Manual option.
1 - When you choose the video you wish to analyze the playback analysis will occur in slow motion. This is normal.
2 - First, attempt to let the app find the lane boundaries. Tap on the lane that you will be tracking. It may require multiple attempts to find the boundaries correctly due to lighting, reflections, camera movement etc. When you are happy with the boundaries you may tap the LOCK button to prevent further re-calculations of the boundaries. (Locking is not required)
3 - If, after three or four taps the boundaries are still not correct, tap on the MANUAL button. Use the circles to drag the corners of the boundary box to match up with the corners of the lane. The boundary lines should trace the outer edge of the lane surface, not the inner edge.
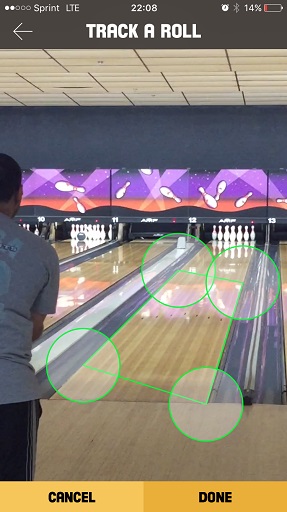

Take care with the back corners of the lane as minor position changes here can translate to reduced accuracy of the shot graph. Press OK when you are ready to proceed with the analysis.
4 - It is possible to select MANUAL mode first before attempting to set the boundaries automatically. This can be helpful if one of the lane corners is obstructed from the start by the bowler, a ball return, etc.
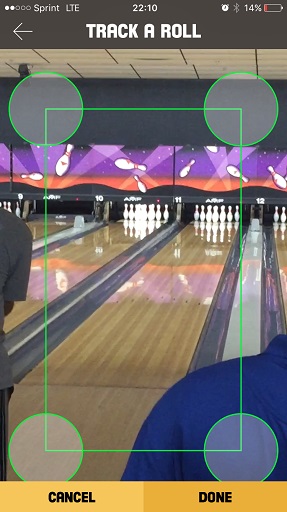
5 - When setting the back end boundary manually it is recommended to position the corners just below the bottom of the corner pins. There should be a sliver of the bottom of the head pin visible. This is not a hard-and-fast rule. Adjusting the back boundary up or down can be helpful if you don't initially get an accurate track on the back end. With experimentation you will get better at judging what works best.

6 - If the boundaries are not properly set by the time the ball is released you can always tap the ABORT button (back arrow in upper left corner) to stop the playback and try again.
7 - Allow your video to play out. Watch as the app tracks the path of the ball with data points as it travels down the lane. When the video ends the app will display the Roll Data screen.
**IMPORTANT NOTES** The app may have difficulty tracking bowling balls with two highly contrasting colors (black and silver for instance) or a single light color like orange or light blue. Darker colored balls will generally produce the best results.
CLEAN THE CAMERA LENS!! Having a build up of oils and smudges can drastically affect the app's ability to lock onto the lane boundaries and the ball. If you video looks blurry, especially at the back end of the lane, this could be the cause.
DO NOT FOCUS ON THE BOWLER. When you tap on the screen to set your own area of focus, be sure to do so on the back end of the lane. The edges of the lane must be in sharpe focus to maintain a good track as the camera moves.
Be sure that your video recording rate is set to 30 FPS (frames per second). This is required for shot tracking and is usually the default setting for normal video recording.
Recording the Roll
1 - During recording, hold your device in a vertical orientation while keeping it REASONABLY STILL. The app is capable of compensating for small movements of the camera.
2 - All four corners of the lane should stay in frame at all times. Even if one of the corners is blocked when trying to determine the lane boundary you can use manual mode to set it.
3 - After the bowler begins their approach it is OK if they obstruct one of the corners of the lane. The app will remember where the corner was and will adjust for any camera movement.
4 - After release, the ball must not be obstructed by the bowler. Any time the ball is obstructed it will affect the tracking of the shot path and may even cause tracking to stop completely.
5 - The ideal camera position will be just off the approach behind the gutter of the adjacent lane (that is the lane to the right for a right hander or the lane to the left for a left hander). The camera position should be no more than one half lane left or right of the target lane as recording from wide angles can result in a loss of accuracy. Recording from a higher position will generally give better results than from a lower position.
6 - Fill the frame with as much of the lane as possible. It is OK to zoom in on the lane prior to the shot being rolled.
7 - End your video capture as soon as the ball exits the back of the lane.
8 - Before analysing the shot, edit your video so that there is not excessive 'dead time' before the shot is released. Seven or eight seconds seems to be a reasonable length for a shot video. You want to leave a few seconds prior to release to establish the lane boundaries either automatically or with Manual option.
Lane Boundaries & Tracking
1 - When you choose the video you wish to analyze the playback analysis will occur in slow motion. This is normal.
2 - First, attempt to let the app find the lane boundaries. Tap on the lane that you will be tracking. It may require multiple attempts to find the boundaries correctly due to lighting, reflections, camera movement etc. When you are happy with the boundaries you may tap the LOCK button to prevent further re-calculations of the boundaries. (Locking is not required)
3 - If, after three or four taps the boundaries are still not correct, tap on the MANUAL button. Use the circles to drag the corners of the boundary box to match up with the corners of the lane. The boundary lines should trace the outer edge of the lane surface, not the inner edge.
Take care with the back corners of the lane as minor position changes here can translate to reduced accuracy of the shot graph. Press OK when you are ready to proceed with the analysis.
4 - It is possible to select MANUAL mode first before attempting to set the boundaries automatically. This can be helpful if one of the lane corners is obstructed from the start by the bowler, a ball return, etc.
5 - When setting the back end boundary manually it is recommended to position the corners just below the bottom of the corner pins. There should be a sliver of the bottom of the head pin visible. This is not a hard-and-fast rule. Adjusting the back boundary up or down can be helpful if you don't initially get an accurate track on the back end. With experimentation you will get better at judging what works best.
6 - If the boundaries are not properly set by the time the ball is released you can always tap the ABORT button (back arrow in upper left corner) to stop the playback and try again.
7 - Allow your video to play out. Watch as the app tracks the path of the ball with data points as it travels down the lane. When the video ends the app will display the Roll Data screen.
Copyright 2016 Dynamic Data Applications - PATENT PENDING